Showing posts with label Gifts. Show all posts

Thursday, December 20, 2012

Teacher Gift Tag

School is just about out for the holidays, so we gave my son's teacher a Christmas present today. We wanted to have a cute little tag to go along with it, and it just seemed fitting that it should be a chalkboard tag, since it was meant for a teacher and all!


This year we got his teacher a copy of one of my son's favorite books for her classroom, as well as a couple movie tickets for her to use to take her husband on a date! It was more than we normally plan on spending probably, but we thought that teachers needed a little extra love this year, after the tragedy at Sandy Hook last week.

If you would like to download a copy of the tag printable you can find it here.

*You can find the chalkboard background here.

*Our printables are for personal use only. Resale or redistribution of our printables is not permitted. Do not claim them as your own. If you post them elsewhere on the internet, link back to our blog and credit Rosewood Corner. Please do not remove any Rosewood Corner watermarks.

Wednesday, December 19, 2012

Merry Christmas Gift Tags

Yesterday, as we were getting ready to take some treats to our neighbors, we decided that we wanted to make some simple but cute gift tags to go with them. And if we already have them made, why not share them with you?


You can download the gift tags here. 

*Our printables are for personal use only. Resale or redistribution of our printables is not permitted. Do not claim them as your own. If you post them elsewhere on the internet, link back to our blog and credit Rosewood Corner. Please do not remove any Rosewood Corner watermarks.

Tuesday, December 18, 2012

"Born to be a King" Printable

We have another Christmas printable for you, we hope you enjoy!


The printable is an 8x10, and you can find it here.

*Our printables are for personal use only. Resale or redistribution of our printables is not permitted. Do not claim them as your own. If you post them elsewhere on the internet, link back to our blog and credit Rosewood Corner. Please do not remove any Rosewood Corner watermarks.

Friday, December 7, 2012

"Christ in Christmas" Printable

We thought we would create a couple printable versions of our "Christ in Christmas" board for anyone that didn't want to tackle a painting project during the busy Christmas season. We hope you guys enjoy!


The printables are in a 16x20 format.
You can find the gray version here.
You can find the tan version here.

*Our printables are for personal use only. Resale or redistribution of our printables is not permitted. Do not claim them as your own. If you post them elsewhere on the internet, link back to our blog and credit Rosewood Corner. Please do not remove any Rosewood Corner watermarks.

Thursday, December 6, 2012

"Christ in Christmas" Board

A few years ago (before Pinterest) I saw a Christmas board that had phrases pertaining to the Christmas season for each letter of the word Christmas. I loved the idea at the time, but Kim and I thought that the phrases would be even better if they had to do with Christ instead of just general Christmas themes. The two of us brainstormed and came up with phrases that we were satisfied with, then made vinyls of our idea so that we could put together some boards with the rest of the girls in our family at Thanksgiving that year. It's still one of our favorite holiday decorations, so we thought it was worth sharing!


Our boards were 20" tall and 15" wide. Kim painted hers cream and then aged it a little with some stain that she brushed on and then wiped off. I painted mine Metallic Taupe from Plaid FolkArt paints. It's a quick and easy project that is a great reminder of what the Christmas season is really about!

Wednesday, December 5, 2012

Disney Inspired Felt Christmas Tree

I saw some adorable kid-sized felt Christmas trees, like this one from Johnny in a Dress, and knew that we needed one for our house. What kid wouldn't want their own tree to decorate, un-decorate and decorate again? And felt tree ornaments mean no broken glass that could hurt little feet. It is a well-known fact that we are huge Disney fans in our house, so it was only fitting that our felt tree had some obvious Disney influences!


The project turned out to be quite a bit bigger than I was expecting! Luckily, my husband is much better at drawing and dimensions than I am, so the ideas I had in my head were able to slowly come to life in felt. The ornaments were inspired by tree ornaments and antenna balls made by Disney, and the presents we just tried to make to fit the personality of the characters that inspired them.

We bought about a yard of green felt, though I think we could have gotten away with less. We spent a little more to get the glittery felt rather than the standard dark green. I just thought the glitter helped the tree look like it already had Christmas lights on it or something...


My husband helped me get everything figured out on paper before we started cutting anything for the ornaments...


We made templates...


And cut out lots of felt pieces:


Felt sticks to felt, so we don't have to glue the ornaments to the tree or add anything to the back of the ornaments to stick to the tree, but we did use hot glue to keep the pieces of the ornaments together. It was so fun to see the ornaments come together! And no Christmas tree feels quite complete without a few presents sitting underneath!


Twenty character ornaments, a star, and four presents later, we have our adorable Disney inspired felt Christmas tree! Our kids absolutely love it and it definitely makes the big project seem worth it now that it has already provided hours of enjoyment for our kids!


Linking up to: 


Whipperberry


I Heart Nap Time

Wednesday, November 28, 2012

The "Magic of Christmas" Printable

Yesterday we shared our "Magic of Christmas" glass block, and while we love it, we know not everyone has easy access to a vinyl cutter of some sort. Or maybe you just aren't loving the glass block idea but love the quote. We figured we would cover our bases and offer a printable for anyone who would prefer it!


We've seen this quote around a lot on vinyl websites, we just felt like we wanted to change the fonts up a bit and also offer it in a printable form. It's such a great quote, and such an important reminder of the real reason that we celebrate Christmas!

We created this printable in an 8x10 format, and you can download it here.

*Our printables are for personal use only. Resale or redistribution of our printables is not permitted. Do not claim them as your own. If you post them elsewhere on the internet, link back to our blog and credit Rosewood Corner. Please do not remove any Rosewood Corner watermarks.

Tuesday, November 27, 2012

"The Magic of Christmas" Glass Block

A couple of years ago we made a Christmas glass block that we absolutely loved. It is really easy to make, so we thought we would share really quickly how we put ours together.


Lowes had a sale going on their pre-drilled glass blocks awhile back, so we picked up quite a few at the time, knowing how much we love glass block projects! If you can get them on sale, pre-drilled is definitely the way to go! We like to start with the clear version (with no texture), and if we want a frosted look, we just spray it with a little frosted glass spray paint like the kind shown below.


We sprayed our block, waited for it to dry, then applied our vinyl. We've seen this quote around quite a bit on vinyl websites, but we wanted to change the fonts up a bit so we made our own version. Then we put a small set of white lights inside and tied a pretty bow around the block! We love how it looks, whether it's daytime and the lights are off...


...or nighttime and the block is all lit up. So simple, but so pretty!

Wednesday, November 21, 2012

{Thanksgiving Fun} Thanksgiving Treat Bags

We really loved the St. Patrick's Day Rainbow Treat that Makoodle put together, and it inspired us to create a Thanksgiving version for a last minute friend and/or neighbor gift, or even to use as a place card for your Thanksgiving table. We made some printables for you, so these treats are really quick and easy. You only need a few things to put them together. 


Supplies
Printables
Pretzel Bags
Chocolates
Scissors
Glue stick
Double-sided tape or glue dots
Cardstock
Stapler

We used the Hershey's minis for our chocolate treats.

Print your wrappers and toppers and cut them out. We made the wrappers and toppers so you have some personalization options, but we'll explain that a little bit later. 

Here are the wrappers:

And here are the toppers:

Fold and wrap the wrappers around the chocolate and use a glue stick to glue the wrapper ends together.

We forgot to get a picture of the next step, but you will want to cut a piece of card stock a little bit shorter and a little bit skinnier than the row of your wrapped chocolates. Then, using double-sided tape or glue dots, secure your row of chocolates to the card stock. This will keep the chocolates in the order that you want them to be in once you place them inside the pretzel bag.

Here is an example of the pretzel bag that we have been talking about:

All you have to do is place your finished chocolate strip into a pretzel bag, cut off most of the excess plastic, and staple on the topper of your choice. 

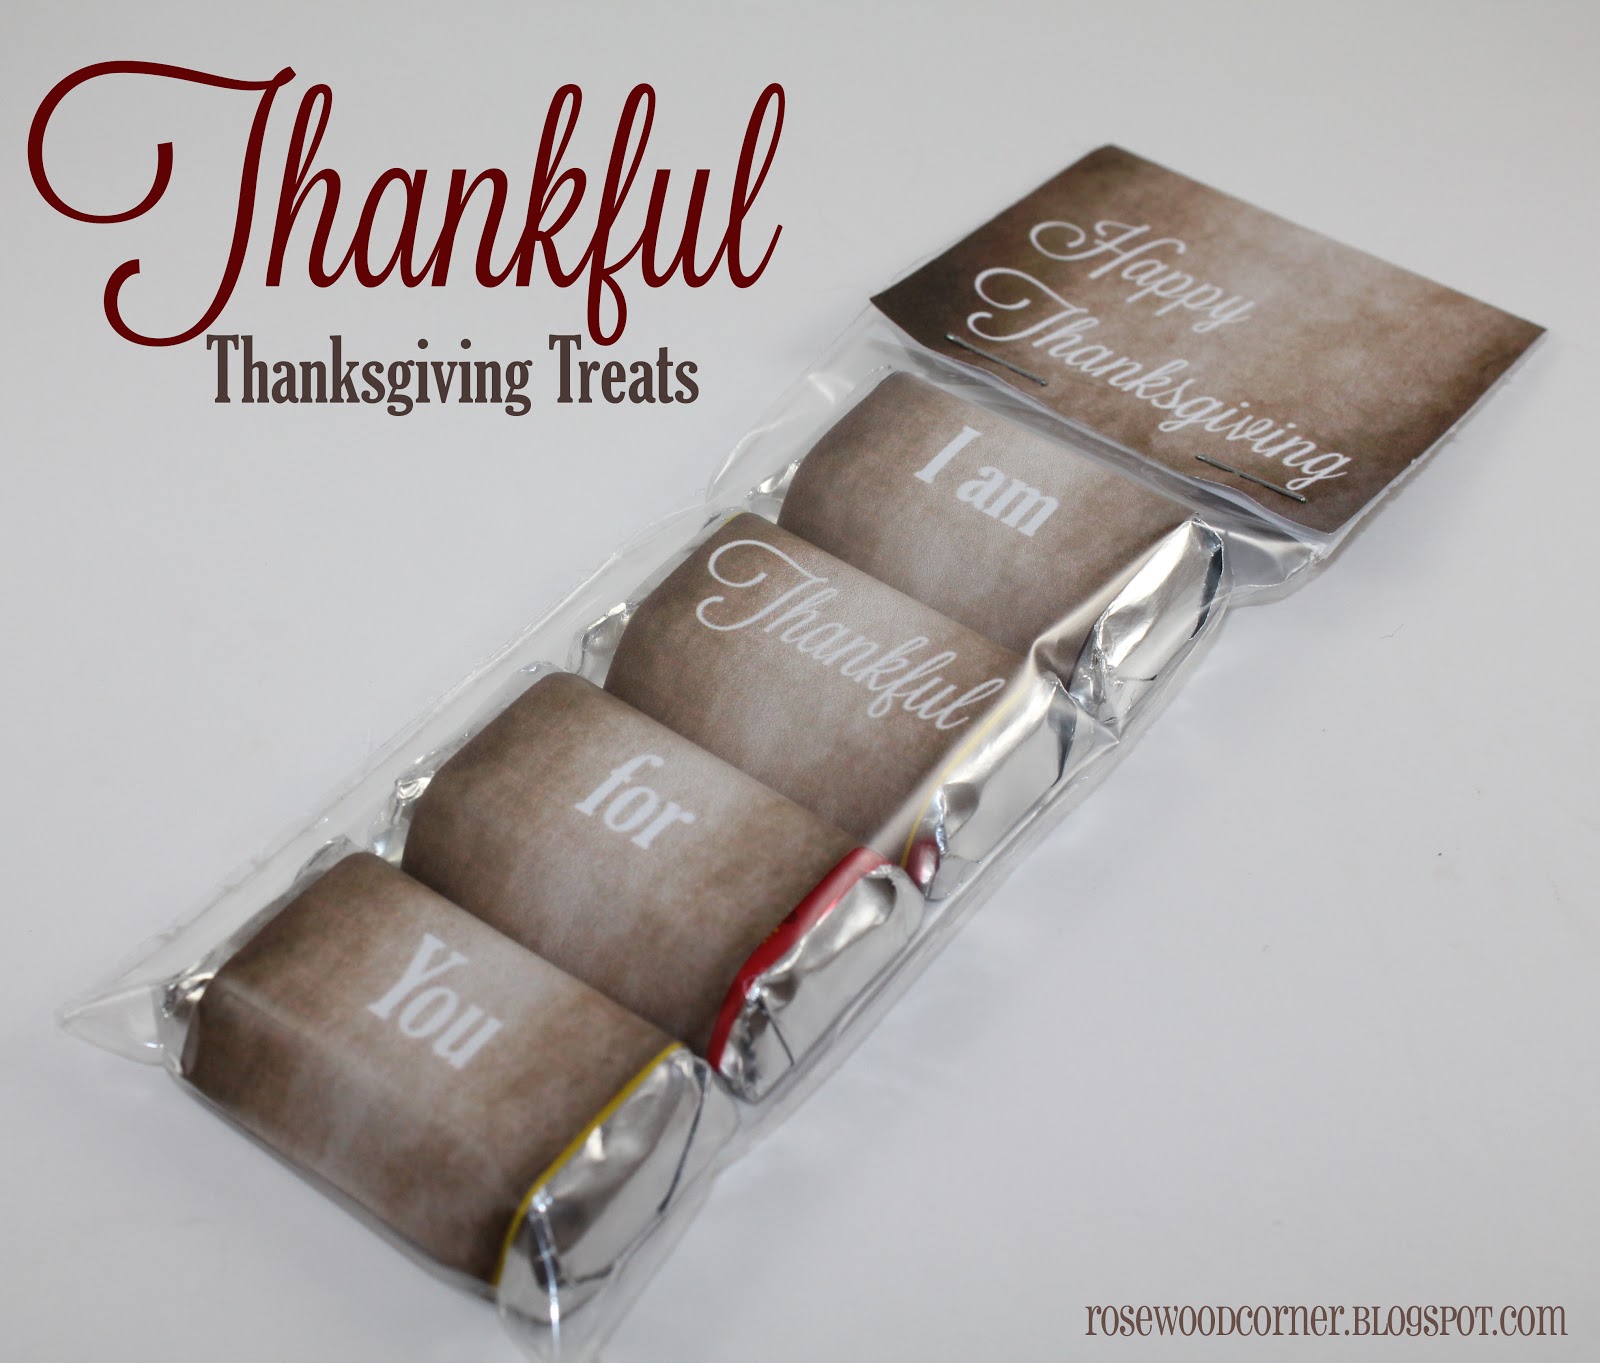
You may choose to personalize the wrapper and leave the topper more generic like below. In this case, you end up with one more wrapped chocolate.

You may want to leave the personalized wrapper out and personalize the topper instead like this:

Or you can just keep it simple and skip the personalization.

However you choose to go about it, our printables have got you covered! We hope you guys enjoy!

You can find your wrappers here.
You can find the more generic toppers here, and the toppers you can personalize here.

*Our printables are for personal use only. Resale or redistribution of our printables is not permitted. Do not claim them as your own. If you post them elsewhere on the internet, link back to our blog and credit Rosewood Corner. Please do not remove any Rosewood Corner watermarks.

Tuesday, November 13, 2012

{Thanksgiving Fun} Pilgrim Hat Treat Boxes

It's always fun to give friends and neighbors a little treat around holiday times, so we came up with this cute little pilgrim hat treat box to share this year. The idea was actually sparked by some leprechaun hat party favors we saw awhile back on a Canadian website (you can find that tutorial here). We thought the idea was cute enough for a pilgrim hat version, though we thought we would make our containers quite a bit smaller. Filling up those big bowls can take quite a few treats!


Supplies
Small disposable bowls (we used Glad 4oz containers with lids)
Black craft paint
Gold sticky backed foam sheet
1/4" white ribbon (ours had some texture to it)
Small foam brush
Scissors
Exacto knife
Glue dots or double-sided tape
Fall Hershey Kisses or another favorite treat

The 4oz containers can actually hold quite a few Kisses or other small treats.


We chose to use craft paint instead of spray paint for a couple of different reasons. We felt like we would have a little more control with craft paint, and since we knew we meant to use these little containers to hold treats, we wanted to make sure we didn't get paint anywhere we didn't want to (like anywhere food might end up touching). We also thought the more textured look we could get out of the craft paint might make the hats look a little more fun. 

The hardest part of painting the hats was getting the paint into the little crevices in the bowl and lid. We wanted to keep the paint out of the inside of the container and the off the inside of the lid, so we used the tip of our small foam brush to squeeze the paint down into the little crevice around the bowl lip. 


After the inside of the lip was filled, we dabbed the rest of the container and lid with paint, taking care to keep the texture even. I think our first container took three coats but we were down to two coats by the second or third container as we got a little better at it. 


While we were waiting for our little hats to dry, we cut out our ribbon. The length of your ribbon is really going to depend on the size of the container you get, so just make sure that your ribbon wraps all the way around your container before you cut it. We attached the ribbon to the painted container with a glue dot, but double-sided tape would work as well. The foam buckle has a sticky back so it will actually help hold the ribbon in place, but we found it easier to work with such a small ribbon if it was secured in place a little better to begin with. 

Foam sticky back sheets come in a lot of different colors, but we thought the gold was especially fun for the buckle.


Since our ribbon was 1/4" wide, we started by cutting out a 3/4" square, so we could have an equal width of buckle on either side of the ribbon. We used an exacto knife to cut out a 1/4" square in the center of the 3/4" gold foam square. Then we removed the backing and placed the buckle on the container so that it would cover the seam where the ribbon met. 

That's it! Just add some tasty little treats and you are ready to go! 


If you really wanted to, you could make a bigger version and fill it with a stack of cookies or something. We'll leave those decisions to you! 

Tomorrow we are sharing a large version to use in some Thanksgiving day games so be sure to check them out!